What are modules?
Modules are the new C++20 method for importing functions and classes from external libraries and separate translational units. Modules provide an alternative to using header files.
Some of the benefits of modules are:
- No need to write separate files for the interface (
.h) and the implementation (.cpp) - Faster compile / recompile times
- No need for include guards
- Modules don’t have ‘side-effects’ so the order in which modules are imported is not important
What’s wrong with header files?
To the compiler, header files are just snippets of code that can be included in a source file via a preprocessor directive.
Header files are really the only practical way (prior to C++20) of safely reusing code from different translational units or external libraries. However, this reliance on header files is the main reason why C++ build times can be excruciatingly slow – header files need to be parsed for each source file unit they are referenced in, and each header file can in turn include other header files which also need to be parsed.
It’s worth mentioning that there are existing methods for mitigating the problem. Precompiled headers can be a very effective way of speeding up compile times. Also, removing implementation details from the interface file (e.g. using the PIMPL idiom) reduces the ‘ripple effect’ and prevents unnecessary recompilation when small changes are introduced.
Changes to language syntax
Defining and using modules in C++20 requires the use of the following tokens:
exportimportmodule
Technically, export is an existing C++ keyword which takes on a new significance in C++20, whereas import and private become identifiers with special meaning.
Concepts
A module is a way of packaging code (e.g. a library or API) for reuse. A module is referenced by name rather than by the header file it lives in, e.g.:
import graphicslib;
This means the definition of a module can be spread across several source files.
A module is compiled into a binary representation (stored in a .ifc file). Using this precompiled interface is much more efficient than using header files (which need to be parsed each time they are referenced).
A module interface unit is the source file (usually a .ixx file if using Visual Studio) defining a module or module interface. The module interface will contain the line:
export module <module_name>;
The .ixx file can contain the just the interface (e.g. function prototypes) or also include the implementation (e.g. function bodies).
If the interface is kept separate from the implementation, the term module implementation unit refers to the file containing the implementation. There is nothing particularly special about a module implementation unit. It is just a standard .cpp file.
A header unit is a kind of precompiled header file, also stored in a .ifc file. Unlike a module, it is referenced by filename (but without the extension), e.g.:
import "graphicslib";
or
import <graphicslib>;
If either of these statements is used, the compiler will look for binary file called graphicslib.ifc. The difference between the quoted and the angle bracket syntax relates to the rules in which directories are searched (similar to the #include syntax for header files).
Visual Studio support
Support for modules arrived in Visual Studio 2019 version 16.8.
For more details, see:
However we need to do a couple of things before we can start using modules.
First, we need to open Visual Studio Installer and install the component named ‘C++ Modules for v142 build tools (x64/x86)’.
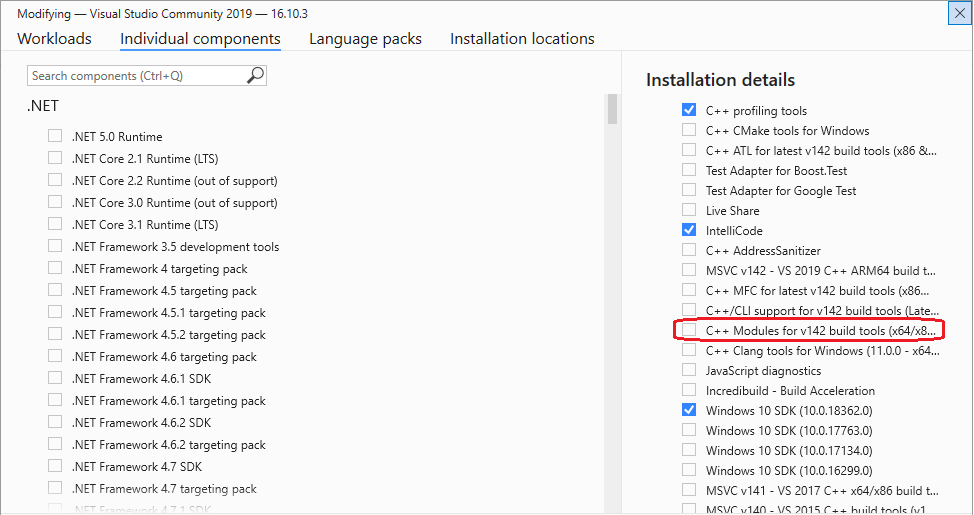
This will install the header units for the standard library. So, for example, instead of including the header file <vector>, you can import the precompiled header unit vector.ifc.
Then, after we have created a project, we need the following compiler flags:
/std:c++latest/experimental:module
These can be found in the Project settings:
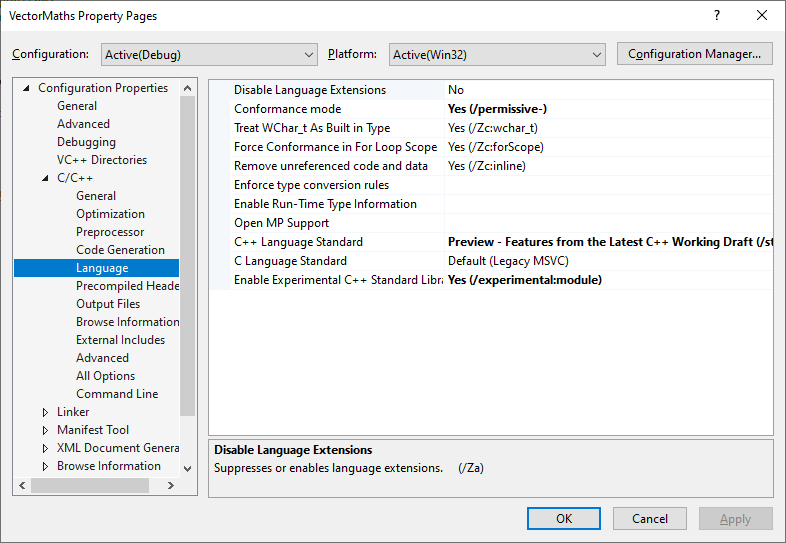
It is also necessary to set the option ‘Scan Sources for Module Dependencies’ to true. This can be found by selecting ‘All Options’ in the left pane and typing ‘scan’ into the search box.
Basic example
Let’s start with a simple example module which exports a single class.
The module interface file (.ixx) is here:
// Vector.ixx
export module vector;

export class Vector
{
public:
	double x;
	double y;
};
and the code which uses the module is here:
// Main.cpp
import vector;

int main()
{
    Vector vec{ 1, 2 }
}
Note that the module name vector could have been anything – it doesn’t need to be the same as the name of the class. It would also be good practice to place the class in a namespace.
Also, note that all members of the class are exported. If you try to mark a member with the export keyword (e.g. export double x;) you will get a compile error. This means that even private members will always be exported (but they can’t be accessed).
Creating modules in Visual Studio
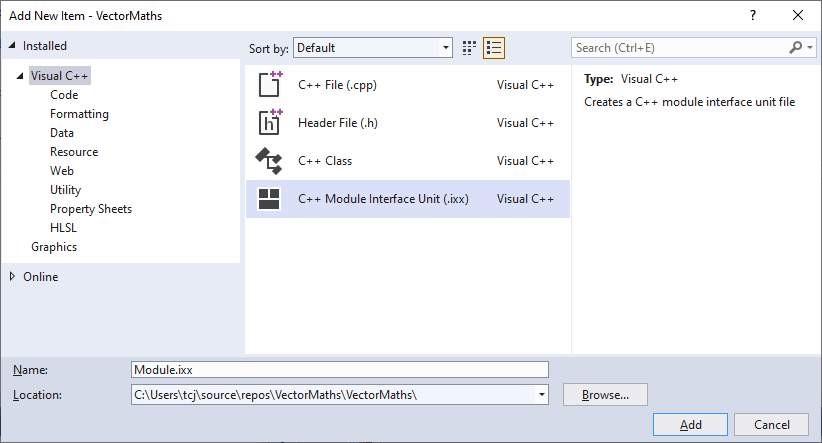
In a Visual Studio 2019 C++ project, if you select Add / New Item…, there is now a new option for ‘C++ Module Interface Unit (.ixx)’:
You can also put your module in a .cppm file – Visual Studio will treat this like an .ixx file and allow you to use the export keyword.
So (for Visual Studio at least) if you want to use the export keyword, make sure you use either .ixx or .cppm file extension.
If you are separating the module interface from the module implementation, the implementation can be placed in a .cpp file.
The global module fragment
It is not possible to include preprocessor directives (such as includes or macros) in an exported module. If our module relies on any header files, these must be placed in the global module fragment which must appear before the export command. For example:
// Vector.ixx
module; // Start of the global module fragment

#include <iostream>

export module vector; // Start of the module

export class Vector
{
public:
    Vector()
    {
        std::cout << "Constructor" << std::endl;
    }

public:
    double x;
    double y;
};
Here, we have added some diagnostic output to our constructor, and this requires the iostream header from the standard library. We need to use the module keyword to indicate the start of the global module fragment. We can then place preprocessor directives after the module keyword.
Including header files in modules
We saw above that we can include header files using the #include preprocessor directive and placing it in the global module fragment.
It is also possible to ‘import’ header units (i.e. the precompiled version of the header file) within the module definition:
// Demo.ixx
export module demo;

import <iostream>;

export void hello() {
    std::cout << "Hello" << std::endl;
}
The difference with this approach is that any preprocessor macros defined before the import command will not have any effect on the imported header. This approach is preferred as it allows the compiler to use a precompiled version of the header which could speed up compilation.
What happens if our function signature relies on externally defined types e.g. std::filesystem::path?
In this case, we can import <filesystem> and export it from our module:
// Demo.ixx
export module demo;

import <iostream>;
export import <filesystem>;

export void open(const std::filesystem::path& path ) {
    std::cout << "Opening file " << path;
}
Then anyone importing our module will automatically get <filesystem> for free. Note that we don’t need to export <iostream> – we only need to import it as we only use it internally within the module. It would seem best practice to only export header files which are part of the interface, as shown.
Importing modules from the standard library
In Visual Studio, it is also possible to import functionality from the standard library using bona fide modules rather than the traditional header files. In our example we would use:
import std.filesystem;
instead of
import <filesystem>;
Note that there is not generally a one-to-one correspondence between standard library header files and the module equivalents. Details can be found here:
For example, many of the standard header files are bundled into the std.core module.
Module partitions
What about if we want to split our module into multiple files? For example, suppose we have a geometry module containing the classes Point and Vector. We would like to have separate source files for each class.
One way to do this is using module partitions. We would first define our two classes:
// Point.ixx
export module geometry:point;

export class Point
{
public:
    double x, y;
};
// Vector.ixx
export module geometry:vector;

export class Vector
{
public:
    double x, y;
};
Then we joint the two fragments into a single module:
// Geometry.ixx
export module geometry;

export import :point;
export import :vector;
Then, if you import geometry, you’ll get both Point and Vector classes. Note that it is not possible to just import geometry:point. It’s all or nothing.
One detail to point out is that defining a partition called :private has a special significance. This will be covered in the section ‘Private module fragments’.
Submodules
An alternative way splitting module definitions into multiple files is to define individual modules for the two classes, e.g., geometry.point and geometry.vector and bundle them together into a single module.
// Point.ixx
export module geometry.point;

export class Point
{
public:
    double x, y;
};
// Vector.ixx
export module geometry.vector;

export class Vector
{
public:
    double x, y;
};
To create the main module, we just import the two submodules and re-export them:
// Geometry.ixx
export module geometry;

export import geometry.point;
export import geometry.vector;
Note that there isn’t really any distinction between a module and a submodule. Both geometry.point and geometry.vector are stand-alone modules in their own right. ‘Submodule’ is just a convenient term for the concept. And there is nothing special in the use of the full-stop separator. We could equally have chosen geometry_point and geometry_vector.
Private module fragments
Consider the following class which makes use of a hypothetical DataConnection class:
// UserDatabase.ixx
module;

#include "DataConnection.h"
#include <iostream>

export module userdatabase;

export class UserDatabase
{
private:
    DataConnection _connection;

private:
    void writeLog(std::string_view msg)
    {
        std::cout << msg << std::endl;
    }

public:
    void addUser(std::string_view username)
    {
        writeLog("Adding user...");
        _connection.addRecord(username);
    }
};
The nice thing about using modules is that the DataConnection class is not exported and the consumer doesn’t need to know anything about it.
Technically, the members _connection and writeLog() are part of the module’s interface. They just happen to be private so the consumer can’t access them. If we added more private member variables, or changed the prototype of writeLog(), we’d be changing the module interface. This would trigger a recompilation of and source files which consume the module.
One way to address this is to use a private module partition. Anything in the private partition is not part of the interface. This helps the compiler figure out exactly what needs rebuilding when the module is modified.
One way to structure this is to use the PIMPL approach.
// UserDatabase.ixx
module;

#include "DataConnection.h"
#include <iostream>
#include <memory>

export module userdatabase;

class UserDatabaseImpl;

export class UserDatabase
{
private:
    std::unique_ptr<UserDatabaseImpl> _pImpl;

public:
    UserDatabase();
    virtual ~UserDatabase();
    void addUser(std::string_view username);
};

module :private;

class UserDatabaseImpl
{
public:
    DataConnection _connection;

public:
    void writeLog(std::string_view msg)
    {
        std::cout << msg << std::endl;
    }
};

UserDatabase::UserDatabase()
    : _pImpl(std::make_unique<UserDatabaseImpl>())
{
}

UserDatabase::~UserDatabase()
{
}

void UserDatabase::addUser(std::string_view username)
{
    _pImpl->writeLog("Adding user...");
    _pImpl->_connection.addRecord(username);
}
The DataConnection instance and the writeLog() function are now completely removed from the module interface.
Having experimented with this in Visual Studio, I was surprised that when I add white space to the private module fragment, all source files importing the module still needed to be recompiled.
If this is a concern, you can split the interface from the implementation, as shown below:
// UserDatabase.ixx
module;

#include "DataConnection.h"
#include <iostream>
#include <memory>

export module userdatabase;

export class UserDatabaseImpl;

export class UserDatabase
{
private:
    std::unique_ptr<UserDatabaseImpl> _pImpl;

public:
    UserDatabase();
    virtual ~UserDatabase();
    void addUser(std::string_view username);
};
// UserDatabase.cpp
#include "DataConnection.h"

import userdatabase;
#include <iostream>
#include <memory>

class UserDatabaseImpl
{
public:
    DataConnection _connection;

public:
    void writeLog(std::string_view msg)
    {
        std::cout << msg << std::endl;
    }
};

UserDatabase::UserDatabase()
    : _pImpl(std::make_unique<UserDatabaseImpl>())
{
}

UserDatabase::~UserDatabase()
{
}

void UserDatabase::addUser(std::string_view username)
{
    _pImpl->writeLog("Adding user...");
    _pImpl->_connection.addRecord(username);
}
I found that I could change anything in the implementation file (.cpp) and this would not trigger a build of any files that depend on the module.
So it would seem there is little to be gained from using private module fragments (in terms of mitigating dependencies and recompilation) other than signalling intention. Perhaps this will be addressed in future Visual Studio updates. In the meantime, separating the implementation from the interface seems the only way to prevent unnecessary rebuilding.
Importing modules from a static library
In Visual Studio, the easiest way is to have a solution with the library and the calling process. Then it is just a case of adding a reference.
However, if you are importing from an externally built library, you’ll need to manually configure a few items.
Firstly, you’ll need to link to the .lib file generated for your library. This is done via Linker ⇒ Input ⇒ Additional Dependencies and Linker ⇒ General ⇒ Additional Library Directories.
However, importing the .lib file doesn’t automatically bring in the modules. What the compiler also needs is the .ixx.ifc file for the module.
You’ll notice that there are 3 new project settings:
- Additional BMI Directories
- Additional Module Dependencies
- Additional Header Unit Dependencies
These are found under C++ / General. I found I was able to build my project once I’d specified the full or relative path of the .ifc file in the ‘Additional Module Dependencies’. In my case, this was:
..\ModuleLib\Debug\UserDatabase.ixx.ifc
Sadly, there is no way to set a search path for these .ifc files in the way that you can for .lib or .h files.